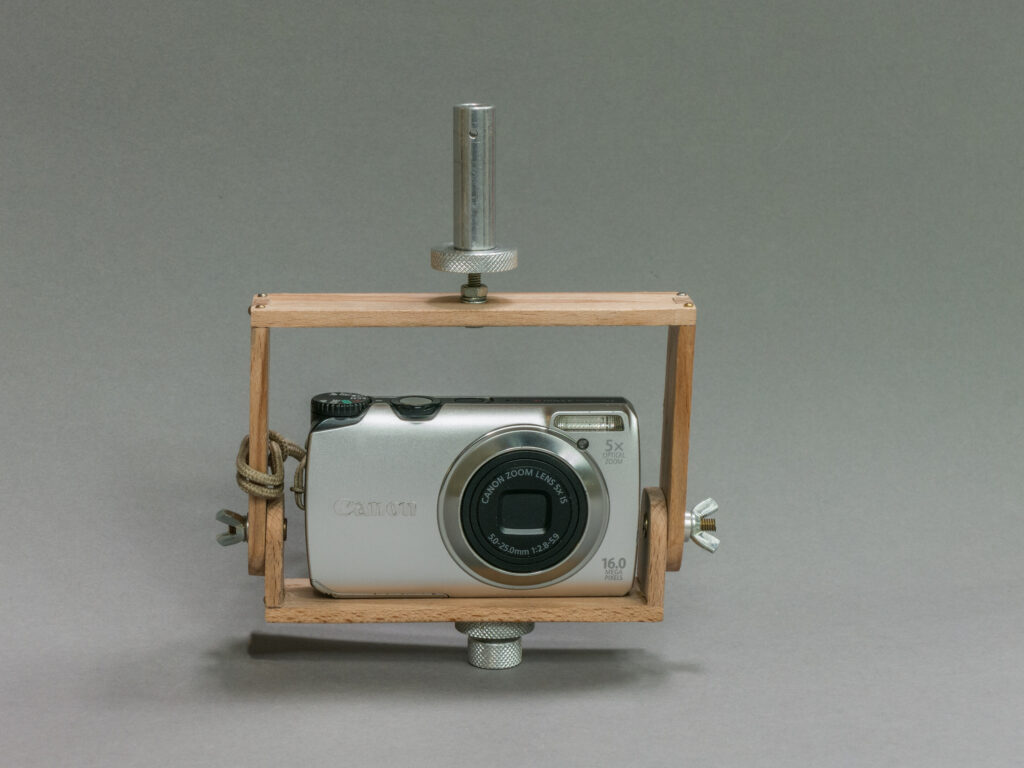
In the meantime, a few days have passed since my last entry in this section, and thus a lot has happened in the field of minimal rigs as well: Minimal Rig 2017.
I only used the version described in the previous section 2-3 times and then built a new version:
The first change, a different camera bracket.

This design has proven itself for more than 2 years and on numerous missions.
I make the PAN setting as well as the TILT setting when attaching the camera to the line, then check during the first few minutes of flight whether my desired subject is also in the picture with the current setting and adjust if necessary. With the large number of shots I take – the camera is usually set to an 8-10 second interval – I’m sure I’ll get something useful, even without a video downlink.
But that doesn’t mean that I won’t try to use this control option in the foreseeable future.
The camera is triggered by a CHDK interval programme.
Weight of the mount: 70 grams
Addition from 6.3.2018:
The following comments reflect my current attitude to the subject of “rig” and, knowing me, may change again in the near future. Possibly even into the exact opposite, because I am constantly thinking about how I can “improve” my aerial photographs. Either through the technique used and/or the approach.
I would like to start with a quote:
“Perfection is not achieved when there is nothing left to add, but when there is nothing left to leave out.”
Antoine de Saint-Exupéry, Terre des Hommes, III: L’Avion, p. 60 (1939)
What does this mean for the construction of my rig? It means that I reduce the components of the camera mount to what is essentially necessary, there are no servos, no receiver, no electrical controls and therefore no batteries. I choose wood for the frame and aluminium for the connecting parts. The result is a weight of 70 grams and a total weight (together with the Canon S110) of 264 grams.
Remote control?
Now you might ask, why is there no remote control, no automated adjustment of PAN and TILT, no remote actuation of the release?
The answer: if the kite is in the air at the desired height and the rig is in the line of this very lifting kite, you can assume that this line or the kite will always move slightly sideways and in height. And so the camera is already somewhere else in the next moment or even just pointing somewhere else. In terms of remote control, this means that I have to steer back and forth for a long time in order to get exactly the section I want.
Exceptions that I have encountered in my numerous flights so far have been flights in an absolutely steady current, such as only occur at high altitudes at certain times of day (inland, summer evening) or at the sea. In gusty winds, as is often the case inland, big and heavy kites together with a heavy rig sometimes help. But these flights are just too exhausting for me.
Therefore, in my opinion, it is quite uninteresting to try to influence the camera position from the ground during the flight.
More important for me are therefore a light mount, a sufficiently large number of usable shots, a kite that lifts the rig even in little wind and continues to fly smoothly if the wind picks up.
A “luxury” that I have allowed myself in the meantime is the so-called video downlink.
Thanks to the corresponding technology, it is now possible to see the image on the ground that the camera is recording. The main task, however, is merely to check the image section; to adjust it, I bring the camera back to the ground.
In the end, because of the constant movement of the camera mount, I almost always have pictures that show the motif from more than one perspective, so that I can choose which one I like best.